Monday, February 25, 2013

One Back Room Down!

As I continue to work through my classroom, I'm taking advantage of strange times.  Like 2-hour delays.  Even though I technically had a delay too, I came in about an hour and a half earlier than necessary to get some organizing time.  Here is the insane amount of winter weather that caused the delay:
The snowflakes did get a bit larger for about 3 minutes.  This is part of the view out my classroom window.  That's our local community center next door.

Anyway, in my before pictures, you got a glimpse of my back rooms.  I am blessed with a TON of storage, but I also share.  The other room is science storage for the school (not even going there yet).  In this room, I have the shelves and cabinets underneath them.  Well.  I would, if I could clean them out.  Still working on that.  It's hard to throw away other peoples' hard work.  Most of the filing cabinets in these pictures belong to the school office manager (who has very little storage), and I have been cleaning out the remnants of about 15 years of past teachers since my mentor retired.  Sloooow work, I tell ya.  So--review the before pictures:
Ugh!  Stuff EVERYWHERE!  I am ashamed.  We sometimes test kids in these rooms during EOGs (all those separate setting kiddos have to have SOMEWHERE to go!), and I wouldn't be able to focus in here.  It's bad, because a lot of our 1:1 students have ADD/ADHD and this would NOT be an ideal setting for any of them.

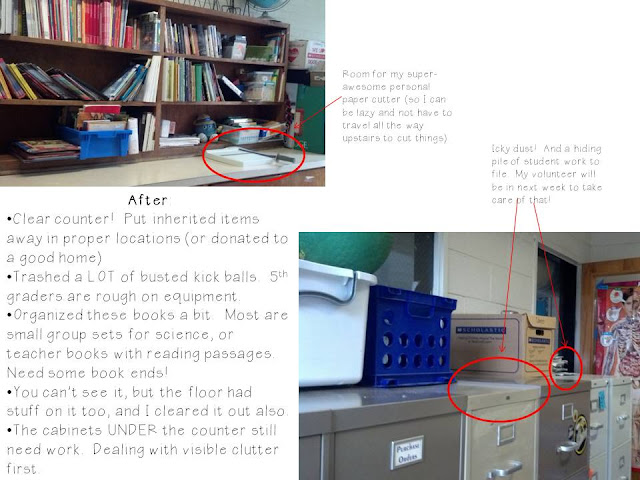
And now:
I wish there was a better way to take in the entire room!  I need a different angle.  Maybe through the window in the adjoining room later...
Anyway, other than dustiness on the file cabinets and some sloppy, leaning books, I feel really good about this space.  I am going to attack those darn cabinets, but I haven't gotten up the nerve just yet.  I think I'm going to work on the visible mess in the other room first.  Then, I can do all the cabinets simultaneously.  That way, I can clear, combine, and reorganize all of the hidden goodies. 

I'm really glad I signed up for this challenge, even if I don't keep up and I don't follow directions and go in my own order.  I was one of those AIG students who ignored directions when I was in school, too.  I'm sure my teachers hated that.  I'm posting to teacher resource organization because that is what MOST of this stuff is.  Don't really know what else to call it...


Monday, February 18, 2013

My Teacher Area


So...challenges and I have issues, apparently.  I am actually making some progress toward a more organized classroom, but I am failing epically at posting about it.  This is probably because I am...ahem...several weeks behind.  With 27 students, no assistant (but I do have a WONDERFUL tutor 3 days a week), and plenty of committee meetings, there hasn't been a lot of time for me to actually WORK in my classroom.  Well, other than the obvious teaching part.

My teacher work space is not exactly typical.  As I noted before, I got rid of my traditional teacher desk years ago.  I am a clutter queen, so the less space I have to junk up, the less junky I get.  I was accumulating some paper debris and some unnecessary pen/pencil/marker mess, so I worked to streamline my storage and to put things away when I was finished with them.  Sometimes I feel like I need to clean out my desk every time I tell a student to do so.  I feel like a hypocrite when I have sloppiness hanging out everywhere and tell them to get it together!

So again--this is my before:  I really wish I could get that *#%$ TV off the wall...


And here is my after:

Sorry the picture of my red guided reading table is so dark!  I had to stay late to assess a potential new student, and it was getting to that point of day where pictures look bad, with or without flash.

I know this may not look like a big change to some, but the little changes I made make me feel so much better!  I still want to work on my shelves above the counter.  I do use a lot of the books and binders on a regular basis, so I don't want to shove the whole thing away in a dark closet, and I don't really want to put a curtain in front of it.  I think I just need to add some better bookends to hold it all together.  I might get a curtain for the shelf with the boxes of books.  I usually just access that once per unit, which I don't mind covering up.

I still have dust bunny colonies on my computer area.  Is anyone else plagued with a classroom with extreme amounts of dust?  I think it comes from the ancient school design. 

Anyway, here is my progress and here I am {finally} linking up!

Saturday, January 12, 2013

Clutter Free Classroom Challenge

So, I know this is theoretically a crafty type blog.  I am diverting from my typical (can you have typical with as few posts as I've written?) post to share my classroom.  I do, after all, have a life beyond making awesome things for my home and my friends. :)

Jodi over at Clutter Free Classroom is posing a challenge for all us teacher folk out here on the interwebs.  We are going to CLEAN UP OUR MESS!  Yes, in all caps.  It WILL happen.

Clutter-Free Classroom
I discovered CFC over the summer when I was spending entirely too much time on Pinterest.  I love her organization strategies for the classroom.  I love having an organized classroom--or rather, love the idea of having one.  My room is the most organized this year that it has ever been.  I moved rooms, and took the opportunity to purge many unneeded items.  Unfortunately, the room I moved to has collected years of clutter.  It has two storage closets in the back that have been collecting teaching supplies since God was a little boy at school here.  Ok, I exaggerate.  But really.  Maybe Moses was here when these closets started getting filled with junk gloriously wonderful teaching supplies.  I am still working on these rooms, but mostly I try to ignore them.  I did work on cleaning them out when my fellow 5th grade teacher retired a couple of years ago, but there is still a long way to go.  The other clutter I have is just random bits and bobs that can't seem to keep a home once they find one.

Here are the revealing and slightly embarrassing pictures:

This is my "teacher desk."  I opted out of a traditional one several years ago when I realized it was a dumping ground for unnecessary items.  

 This is my guided reading table, and where I sit to do most of my planning and grading.  The stuff on the window ledge behind the table is my teacher stash--files, stickers, post-its, pens, etc.

This is the counter beside my group table.  My lesson plan book lives here, as well as my copies (in the pretty magazine files), supplies for the week, my Scentsy (fifth graders can really stink!), and my communication folder bin.  My goal is that the supply stash can move to one of the back closets after they are cleaned up a little bit more.

This is the view from my teacher spot at the red table.  I can see out the door (and out the actual door), and I can see that pile of mess under our student supply table.  It needs a bit of work too.  Somehow, we can't seem to put things back in a tidy manner.  I think there might be permanent marker outlines for things in the near future.


And, what you've all been waiting for--the back rooms!  I tried to get good pictures, but the rooms are narrow and long, so it is difficult to see everything.  Here is room one (school-wide science supplies and the old fourth grade teacher's material):

And room two:

By the way, all those filing cabinets aren't mine.  The school data manager keeps files down here too.  That is part of the problem--these rooms are a catch-all, and no one ever worries about what they look like. 

Eeep!  Wish me luck.  I will probably start with the visible areas in the actual classroom, and then tackle the scary rooms it chunks during work days and such.

Friday, December 7, 2012

Going Natural...Very Slowly

As I grow older {snort.}, I start to go back to my hippie roots.  I'm not sure where they came from.  My parents are perfectly normal people.  They both have normal-people jobs.  Well, if working for a cigarette company and the clerk of courts is normal, anyway.  My mom did stay home when I was a wee little tyke, before I started school.  She did make quite a lot of my clothes, and my grandparents have always gardened, but overall, normal country folks. 

I, however, have always been a tree hugging, animal saving, dirt worshiping hippie.  I was allowed to run around in the woods barefoot too much, I suppose.  One of my elementary friends and I were going to live in a treehouse when we grew up and make all our own clothes and such.  Sat around at recess hand-sewing a "quilt" together.  Anyway.  I digress. 

I have slowly been weeding out our commercial cleaners--home and self.  So far, I have homemade bathroom cleaner, laundry detergent, dishwasher detergent, and now disinfecting spray.  I am most pleased.  I basically have just started replacing the store-bought stuff as we run out.  We went through a heavy couponing phase, so it will probably be sometime in the next millennium before the hubs runs out of soap, but that's alright.  I'm not going to purge and throw out everything.  I feel like that kind of defeats some purpose since it would all end up in the landfill.  My closet is now filling with things like washing soda, castille soap, borax and a serious I-kid-you-not 15 lb. bag of baking soda.  You should all go take out stock in Borax.  Or Arm & Hammer.  I seriously can use up some baking soda and borax. 

I have found many of my recipes on Crunch Betty's blog--total plug here, but no, I'm not getting compensated in any way.  Like enough people read this for her to want to compensate me anyway.  But, hey, Leslie--if you stumble upon this, I'm open to free stuff any time.  :)  This chick is amazing.  An inspiration.  And hilarious.  I used her formula for spray, and I really struggled with the whole two-week incubation period.  I didn't want to wait for my vinegar to infuse!  But I did, and now my counters are sparkling.  And best of all, I know there isn't any nasty stuff for my fur babies to lick up.  Aurora was the world's worst to lick up any 409 that landed on the floor. 

If you're looking for some inspiration, check out my Pinterest board on Cleaning and Such Nonsense.

Thursday, September 6, 2012

The Long-Awaited Owl Tutorial


I know that you all thought this day would never come.  That I had teased you and run away from the blogging world.  Well.  Maybe I came close.  And school started back, which means my free time is close to zero right now.  I have 27 fifth grade students who command my attention right now, which is a bit more pressing than sewing cute lil' owls.  Maybe not as relaxing, but definitely more in-my-face.

So--On to the the tute!  (I really am bothered by the addition of that "e".  Anyone else? No? Just me then.)

Step the first:  Gather the following materials:
  • An old, crapped out tape measure
  • A pair of scissors you aren't terribly partial to
  • Scrap batting (you'll need a 7"x11" rectangle)
  • Pouch fabric (fat quarters are great!)
  • Scrappy fabric bits for the owl
  • Some stabilizer if you have thin fabric or you are OCD about your applique
  • Duct Tape--and don't waste your pretty stuff on this project!

Step the second:  Lots of cutting!
  • Using your scissors, cut two 6" long pieces of tape measure and round the ends.
  • Next cut the following from your INTERIOR fabric:
    • one 7"x14" rectangle
    • two 4" squares
    • one 2"x7" rectangle
  • From your EXTERIOR fabric cut:
    • one 7"x11" rectangle

  • Cut a 7"x11" rectangle of batting

  • The owl pieces:
    • One owl body (I free-handed mine) about 2.5" tall
    • Two tiny owl wings, using your owl as a template
    • One owl tummy
    • One owl beak, or you can embroider this piece.  I cut mine later, so no pic now.  Just a tiny triangle is fine.


Step the third:  Some quiltin'
My machine has a free-motion quilting foot and allows me to lower the feed dogs (weird name, no?) so the fabric can glide about whilst I quilt any pattern I so desire.  I thought I'd show you what this looked like on my machine so you'd have some idea of what to look for on yours-if you don't already know, of course!

You will need to layer your pop pouch as follows: the interior fabric face-down on your table, followed by centered-up batting, topped by the exterior fabric face-up.  Pin all three layers together before quilting.


Fourth:  Some ironing and prep work

You are going to make two Prairie Points for pull tabs and a strappy little handle for the pouch.  I use my iron quite a bit for these two.  The Prairie Points only require ironing before attaching, but the strap requires a bit more work.

Prairie Points:
  • Iron your square in half, right sides out.
  • With the fold at the bottom, pull one corner up to the top middle.  Iron down.
  • Repeat with other side.


 Strappy Little Handle:
  • Iron your 2"x7" strip in half longways, right sides out.
  • Open it back up.  
  • Iron both outside edges in to the middle, right sides out.
  • Fold closed along the center line.  Iron one more time for good measure.
  • Sew up the open side to create your strap.
  • Be fancy and sew up the other side so it looks polished.  Or be lazy and don't.  It's your bag, after all.

Tape Measure:
Remember him?  You need to cover the cut ends of the tape measure with duct tape so they don't poke through your fabric and make you sad.  Feel free to do this however you please, but this is how I make it happen:


Fifth: Sew pockets for the tape measure and add your prairie points.  Oh, and a tag if you want one.

Back to your quilted pouch body that has been languishing beside your sewing machine!  Fold down each end that sticks out past your exterior fabric about 1-1/2".  Then, fold in a hem.  I give myself about a 1/4".  Your final pocket should be about 1-1/4".  If you have extra wide tape measures, you may need to adjust this.  Place your prairie points in the center of each pocket.  The tip of the point should be 3-1/2" from either edge.


Sixth: Switch thread color and sew your owl!

I sewed all the little bits and pieces to my owl before I sewed him down.  I used pink thread for wings and belly.  I switched to black thread for the beak.  I hand-sewed the eyes on right before I put the owl onto the bag.  You just have to play with where you want your feathered friend to live.  I wanted one of the knots in the wood grain of my fabric to show, so I made sure I put my owl beside the knot, not on top.  (yes, all puns are intended)  Also make sure your applique won't be on the fold when you sew your bag up--you want all of the bird on one side of the pouch.  *Don't forget to switch back to pink to sew the owl down!* If you do forget, your seam ripper will be your friend. :)


Seventh: Tape Measure
Put that tape measure in those pockets you made for it!
Be sure that your tape measure's back is to the front of your pouch.  This creates the closure.
Center up the tape measure in the pocket.  You should have about 1/2" on either side.  This makes your seam allowance and room for the edge of the pouch.


Step Next-to-Last:  Sew up your pouch!

Pin your strappy lil' handle right against your pocket, on the opposite side as your owl.  The raw edges should all match up, both bag and strap.

Fold your bag in half, right sides in.  You might want to pin this time so you don't wind up with the front of your bag sticking out over the back.

Sew a straight stitch up each side.  Careful!  Don't hit that tape measure with the needle.  It WILL break.  I promise.  Also, you might want to press the tape measure as flat as possible when it gets under the presser foot.  You will definitely want to back stitch at the beginning and end of this seam.

After you straight stitch, go back with a zig-zag stitch up both sides.  I double up at the top where the tape measure is to reinforce it.  If you are more awesome than I am and have a surger, you could use it here.


 Carefully flip your pouch right-side out.  I recommend removing the pin in your strap first. 

Step the LAST!

Use some Fray Check on all those visible stitches where your tape measure is.  Just to be safe.


Rock your awesome pouch!


 I am going to link this up to some way-cool linky parties.  I will add buttons as it is linked.

Thursday, June 28, 2012

Menu Board

So I know I promised a tutorial on the pop pouch with the owl.  I will get to it, really really!  I have a slight ADD problem, and I always seem to be working on a least 3 things at once.  Like today--I have really been coveting the menu boards I have seen on so many blogs, pinterest, and etsy.  So, I made myself one.  It isn't as super fancy as some of the pricy ones, and I am sure any self-respecting crafter would be horrified at my lack of brads, distressed inking, or burlap.


I did go buy a new picture frame for this project, but Kohl's had them Buy One, Get One for $1, and I had 15% off, so I didn't feel too bad.  Also, it is an eco-friendly frame.  So it's justified, right? :)

I used muslin for my background, and I just wrapped it around the piece of paper from the center of my frame.  I cut it 1" larger in all directions, folded, ironed (turn the steam off, trust me), and dabbed a little craft glue to hold it down.

The lovely ribbon is from Michael's.  I probably bought it after Christmas for $1 a piece several years ago.  Again, eyeballed it--laid it where I wanted it, cut a couple extra inches on either end, and ran a bead of glue down the center and stuck it on, wrapping around to the back.  I did lay the MENU letters down first to decide where to put the horizontal ribbon.

I am sure scrap booker people know some vastly better method for sticking paper down, but I just used my craft glue again for the letters and the days.  I made this loveliness on my computer using Power Point.  I saved it as a PDF just for you guys!  Feel free to make your own menu, and for goodness sakes doll it up more than I did.


I didn't even wait for the glue to dry before I stuck the whole works back in the frame, closed it up, and wrote out next week's menu!  I'll update this post when it makes it to the wall and get rid of this crap-tastic picture of it laying on my cutting table.

I had to share this picture of my darlin' Priss "helping" with another project.  It's what she does.


Tuesday, June 26, 2012

The Best Sound in the World

Is the tink tink of cans sealing.  Happiness in a jar.

Also, for those doubters out there saying you can't can on a flat-top range.  I have news for you: you can can!  (And also do the can-can if you so desire!)